Introduction
Recently I’ve been studying motion and I wanted to write a post regarding what I’ve learned primarily regarding
easing.
I stumbled upon Rachel Smith’s beginner post on easing,
a couple weeks ago which was really eye-opening.
Starting out, these tips were really helpful and spurred more research
on the mechanics and principles of easing.
Some additional resources I would recommend reading are
Some of the key points to take away from these posts regarding motion in general include
- Physical objects have mass and move only when forces are applied to them. Consequently, objects can’t start or stop instantaneously. Animation with abrupt starts and stops or rapid changes in direction appears unnatural and can be an unexpected and unpleasant disruption for the user.
- Motion with swift acceleration and gentle deceleration feels natural and delightful.
- Enter and exit frame at peak velocity. This behavior emulates natural movement: a person entering the frame of vision does not begin walking at the edge of the frame but well before it.
Easing in when entering and slowing down when exiting draw the user’s attention to that motion, which, in most cases, isn’t the effect you want.
Likewise
- Use ease-out to move something onto the stage
- Use ease-in to move something off stage
- Use ease-in-out to move something across the stage (from one point to another)
- Account for mass. Lighter/smaller objects may accelerate or decelerate faster, because they have less mass and require less force to do so. Larger/heavier objects may need more time to reach peak speed and come to rest.
There are already lots of posts around the web
teaching you how to implement CSS transitions and
use jQuery Easings as well
as tools to select
and create your own easings.
The purpose of this post is to develop an intuition of easing by:
- develop an understanding of what easings are and the relationship between
different easings
- learn how to select/apply easings
- examine real world application of easings
such as on Flickr’s website
and Google Glass’ website.
Motion and Tweening
In filmaking, movies or motion pictures can be thought of as a series of still images or frames that
compose a complete moving picture.
Likewise in traditional animation, animators would either draw out every single frame
of an animation from start to end with the straight ahead technique or draw keyframes (important
frames of a sequence) and then generate intermediate frames between
the keyframes known as inbetweens. The process of generating intermediate frames
between keyframes is also known as tweening or interpolating and the resulting sequence of frames
is known as a tween.

The top illustrates a straight-ahead technique, while the bottom represents
the keyframes that will be used from pose-to-pose animation
Source: Smashing Magazine
From a programmatic perspective, motion is simply the numerical
change of position with time.
What is easing
Easing comes into play because it used to model how position changes with time.
Robert Penner created a set of easing functions to model these positional changes.
Easings are applied to tweens to specify the speed at which the animation progresses
at different points within the tween.
Note on position
As Robert Penner notes,
position doesn’t have be a physical position but can be any one dimensional value
such as opacity. Of course you can animate two- and three-dimensional motion
such as area and volume, but these animation are broken down into several
one-dimensional values.
How to interpret easing graphs
There is quite a selection of easing functions to choose from, so how do you choose which one works best for you?
Luckily, these easing functions have been visualized as position vs. time graphs, so understanding how to interpret these
graphs is crucial for selecting the right easing. You can also “listen” to these easings.Position is the y axis (vertical) and time is the x axis (horizontal).
For the most part, each axis is bound between 0 and 1 (representing 0 to 100% of position or time),
but as we’ll see position of easings such as easeOutBack can exceed 1 and easeInBack can go below 0.
You can also think of the bounds of the y and x axes representing start/end position and start/end time respectively.
As a physics refresher,
change in position = displacement = (position2 - position1)and average velocity = displacement / time.
Looking at a position vs. time graph, we can interpret a line or curve as a set of points. Each point represents a position.
If you take the slope between the two points (position2 - position1) / (time2 - time1) then you get the velocity within that time frame.
It also important to remember that velocity is a vector quantity meaning that it represents
both a value and direction (how fast and in which direction), whereas speed is a scalar quantity only representing a value (how fast). So negative velocity
represents the same speed of an equivalent positive velocity but in the opposite direction.
Finally, if you take the slope of the velocity graph, (velocity2 - velocity1) / (time2 - time1) then you get the acceleration.
In other words, acceleration tells you whether or not the object speeds up or slows down with time and in which direction.
An acceleration of 0, means that velocity was constant.
The follow graph from here
as displayed below visualizes these concepts well.
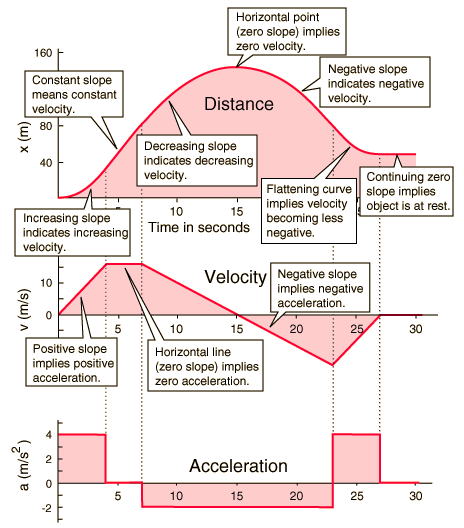
Source: Hyperphysics
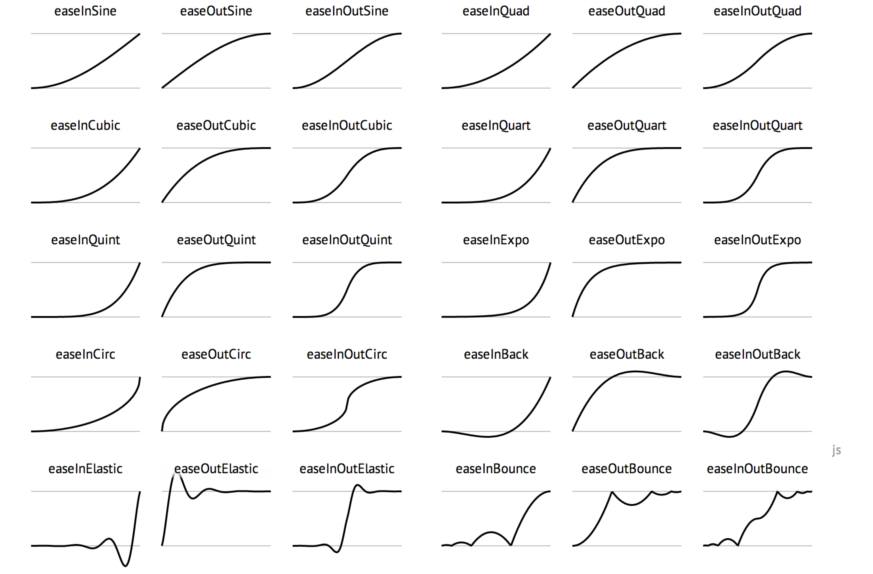
There are 4 basic easing functions :
1. linear
2. ease-in
3. ease-out
4. ease-in-out
Below we’ll look at how to interpret these graphs.
I would also recommend playing with this
easing visualization
created by Gilmore Davidson which is where the
following images are adapted from.
Linear
Source: SydJS Easing Presentation
The slope of this graph is a constant value, because the line is straight.
A constant velocity means that there is no acceleration.
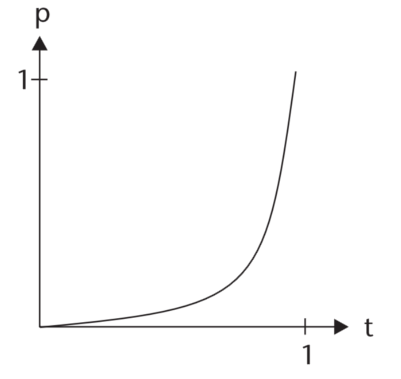
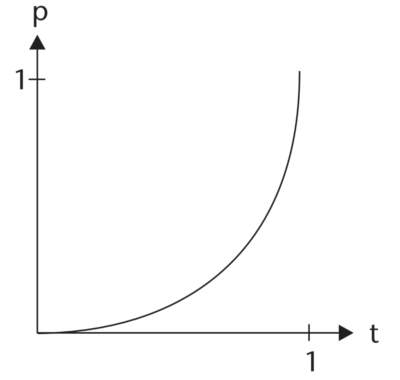
Ease-In
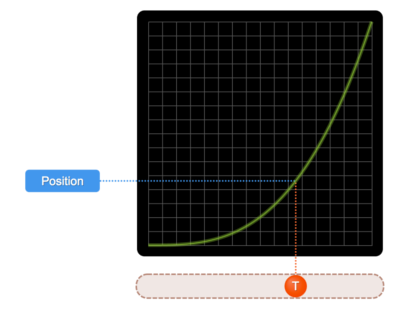
Source: SydJS Easing Presentation
The slope of this graph gets steeper over time meaning that the velocity increases over time.
In other words, the object starts out slow and accelerates over time.
Ease-Out
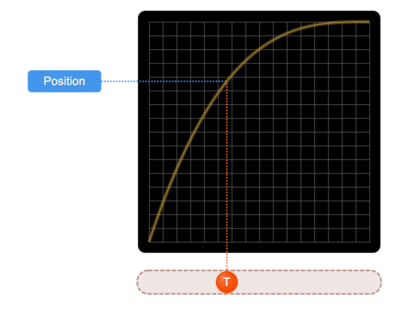
Source: SydJS Easing Presentation
This graph behaves in the opposite manner of an ease-in graph.
The slope of this graph gets flatter over time meaning that the velocity decreases over time.
In other words, the object starts out fast and decelerates over time.
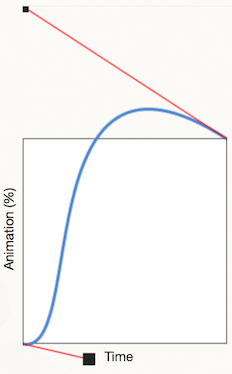
Ease-In-Out

Source: SydJS Easing Presentation
This graph is a combination of an ease-in and ease-out graph.
Looking at the slope, we see that initially the object starts out slow and accelerates over time before hitting a peak velocity,
followed by a gradual deceleration before stopping.
Different Degrees of Easing
These “standard” easing classes model position as a power function of time t
raised to some power: Linear - 1, Quad(ratic) - 2, Cubic - 3, Quart(ic) - 4, Quint(ic) - 5.
We’ll look at these different degrees of easing by examining the easeIn curve.
Recall that the bounds for time are between 0 and 1 and that decimal values yield smaller values
when raised to increased powers.
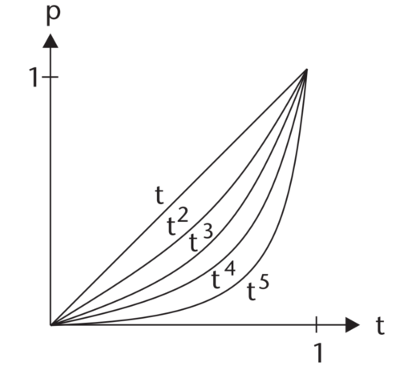
Source: Penner
Let t = 0.8
    t^2 = 0.64
    t^3 = 0.512
    t^4 = 0.4096
    t^5 = 0.32768
Since decimal values yield smaller results decrease with increased power,
this means that increasing powers exaggerates the easing effect.
In particular for easeIn easings, the object remains slower for a longer time and
accelerates faster when it finally speeds up.
Linear
Power of 1. Uses Constant Velocity.
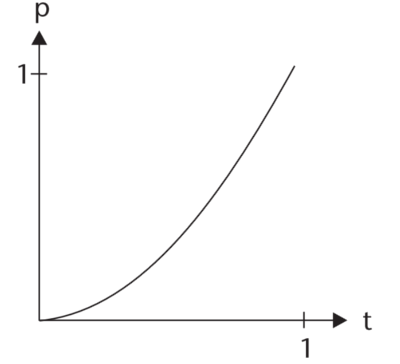
Quad
Power of 2. Interesting tidbit to distinguish Quad from Quart: Although the prefix quad means four, quad originally referred to the four sides of a square.
Therefore a squared variable is a quadratic.
Cubic
Power of 3.
Quart
Power of 4.
Quint
Power of 5.
Other Easings
Sinusoidal Easing
Source: Penner
The position is a function of a sin: p(t) = sin(t * π/2).
Sinusoidal easing is quite gentle, even more so than quadratic easing.
Its path doesn’t have a lot of curvature. Much of the
curve resembles a straight line angled at 45 degrees, with just a bit of a
curve to it.
Exponential Easing
Recall that for an exponential function such as exponential growth,
time t is an exponent 2t, whereas in power functions time is a value raised to a constant value for example t2.
Generally exponential functions grow faster than power functions and are therefore more exaggerated.
Source: Penner
History of Exponential Easing
The Exponential Easing is based off what Robert Penner calls the standard exponential slide,
that was used often used in ActionScript, a dialect of ECMAScript used for Flash.
// a standard exponential slide
this.onEnterFrame = function () {
var distance = this.destinationX - this._x;
    this._x += distance / 2;
};
The idea is simply that you
move a fraction of the distance—say one-half—to your destination in each
unit of time. For instance, if you need to move a total of 10 feet, you could
move 5 feet, then 2.5 feet, then 1.25, then .625, and so on.
Notice that this is a Geometric Series,
which is a sum of a sequence of terms where there is a constant ratio between successive terms.
The sum of a Geometric series is c / (1 - r), where c is constant multiplied to each term and r is the ratio between each term
We can verify the above example: 10 = 5 / (1 - 1/2) where c = 5 and r = 1 / 2.
Circular Easing
Source: Penner
The position is a based of the equation for a half circle: p(t) = 1 - sqrt(1 - t^2).
This equation is derived from the equation of a unit circle x^2 + y^2 = 1
Solving for y, we get that the upper half of the circle is y = sqrt(1 - x^2).
Likewise the lower half of the circle is y = -sqrt(1 - x^2), because negating the equation flips
the graph vertically (over the y axis).
Finally we add 1 to the equation so that the unit circle is shifted up to top y = (-sqrt(1 - x^2)) + 1,
Since the bounds of time > 0 our graph is a quarter circle residing in the top right quadrant.
This can be rewritten as y(x) = 1 - sqrt(1 - x^2).
Similar to quintic and exponential easing, the accleration for circular easing is dramatic, but it also happens
more suddenly.
Since the circle exhibits more curvature, we see a greater range of velocity as well as sharper changes towards the
beginning of easeInCirc and at the end of easeOutCirc.
The following diagram displays all easings mentioned so far in juxtaposition,
ordered by roughly increasing curvature/acceleration.
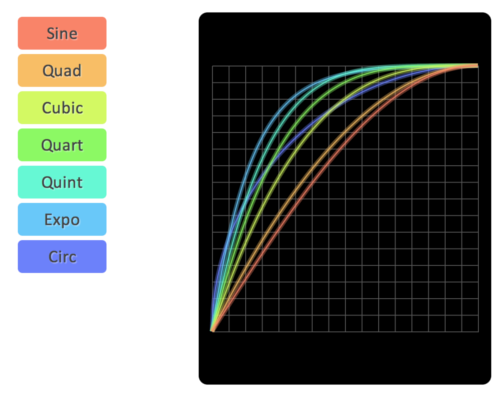
Source: SydJS Easing Presentation
Special Effect Easings
More complex curves have been modeled to create special effects.
Back
This easing exceeds the start or end position for easeIn and easeOut respectively, before springing back into place.
The easing displayed below is easeOutBack.
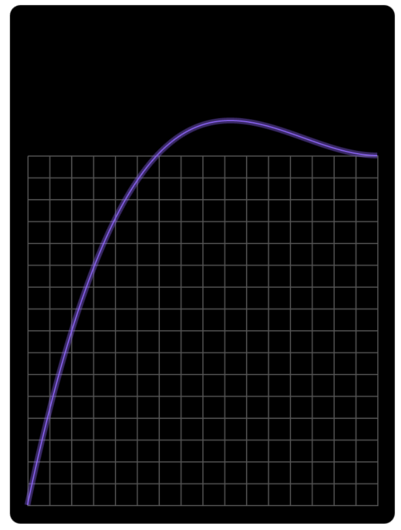
Source: SydJS Easing Presentation
See the Pen easeOutBack by Anthony Su (@radialglo) on CodePen.
Elastic
This easing oscillates around the start or end position for easeIn and easeOut respectively.
Source: SydJS Easing Presentation
See the Pen easeOutElastic by Anthony Su (@radialglo) on CodePen.
Bounce
The start and end position form boundaries for easeIn and easeOut respectively, whereupon the object bounces.
Source: SydJS Easing Presentation
See the Pen easeOutBounce by Anthony Su (@radialglo) on CodePen.
CSS Easing
Although Robert Penner’s equations were written originally as functions, many of these functions
can also be used in CSS3 using the cubic-bezier transition timing function.
These functions have been approximated as cubic bezier curves by Matthew Lein.
For more on bezier curves read this article.
Here is a bezier curve simulation from Jason Davies
and another one by Tim Holman.
A limitation of using cubic bezier curves is that cubic bezier curves contain at most one peak and one valley.
So if you want to use an easing that has more than one peak/trough, such as easeInElastic or easeInOutBounce
then you must use a JavaScript or some other programmatic implementation of easing.
How to apply easings
Generally speaking, linear motion is often mechanical rather than natural.
You want to conform to the natural laws of motion so that your animation is believable.
However this does not mean you should completely ignore linear easings
even if your not animating mechanical objects.
Easings don’t neccesarily need to model physical position, but can really
used to model any kind of one dimensional value such as opacity.
Similarly some applications of linear easing can be used for creating
camera effects like zooming or panning when creating a timelapse
or the Ken Burns Effect
for creating videos with still imagery.
Naturally, your eye will be able to discern something moving at a slower speed
than something moving at a higher speed. It’s no coincidence that slow motion scenes
in action movies also tend to be the most interesting.
As such, enter and exit the stage at peak velocity. Entering and exiting the stage
are less important in comparison to when the object finally halts on stage or
begins to leave the stage, respectively.
Timing
If your just starting out some suggested duration of easings
are
Ease-outs: around 200ms - 500ms. This gives the eye chance to see the animation, but doesn’t feel obstructive.
Ease-ins: around 200ms - 500ms. Bear in mind that it will jolt at the end (from the acceleration) and no amount of timing changes will soften that feel.
Bounce or elastic effects: around 800ms - 1200ms. You need to allow time for the elastic or bounce effect to ‘settle’. Without this extra time the elastic bouncing part of the animation will be really aggressive and unpleasant to the eye.
Car example
We’ll be animating a car to understand how to apply easing.
EaseInOut
Initially your car starts out parked. When you start your car,
you need to push on the pedal to accelerate to a comfortable cruising speed
and finally when you are stopping at stop light you gently decelerate
so that the ride is comfortable for your passengers.
If you were to witness the full start and stop action of the car you
would see an easeInOut easing.
Use easeInOut to move something across the stage (from one point to another).
See the Pen Car driving across stage by Anthony Su (@radialglo) on CodePen.
EaseOut
Let’s say you were to see a friend arrive at your house for an evening party.
By the time your friend reaches your house he/she will already be traveling
at peak velocity and will gently decelerate before parking in front of your house.
Use easeOut to move something onto the stage
See the Pen Car driving onto stage by Anthony Su (@radialglo) on CodePen.
EaseIn
After the party, you say goodbye to your friend and watch as his/her car leaves
your neighborhood. Your friend needs to start the parked car
and accelerate to reach a comfortable crusing speed.
By the time the car leaves your field of vision it will be traveling at peak velocity.
Use easeIn to move something off stage
See the Pen Car backing off stage by Anthony Su (@radialglo) on CodePen.
Now that you know how to apply easeIn, easeOut, and easeInOut
you can change the power of your easing (Quad, Cubic, Quart …)
to minimize or exaggerate the effect.
Easings in the Wild
Next let’s examine how easing is being used across the web.
Flickr
Flickr is built using YUI, Yahoo User Interface Library,
Yahoo’s JavaScript framework.
The site currently uses scroll-jacking, which is
the process of overriding default user scrolling with a custom
interaction design paradigm.
The user interface also has arrow buttons, bullet lists, and accepts
keyboard input such as space bar / page down, j/k, arrow keys for navigation.
From the source code we can see the handling of keypresses and clicks.
All of these input methods are used to animate the scroll position.
Keydown Source
Y.one(document).on('keydown', function(e) {

    var down, up, beginning, end;
    var ignoreMultiple;

    // space bar / page down, j/k, arrow keys
    if (e.keyCode) {
        down = (e.keyCode === 32 || e.keyCode === 34 || e.keyCode === 74 || e.keyCode === 40);
        up = (e.keyCode === 33 || e.keyCode === 75 || e.keyCode === 38);
        beginning = (e.keyCode === 36);
        end = (e.keyCode === 35);
    }

    // ignore if in an input, select/option etc.
    if (!document.activeElement || !document.activeElement.nodeName.match(/(input|select|option)/i)) {

        // block multiple events only for up/down arrow keys.
        if (!down && !up) {
            ignoreMultiple = true;
        }

        // do the nav thing
        if (down) {
            animateTo('#section-' + getNextSection(), ignoreMultiple);
        } else if (up) {
            animateTo('#section-' + getPreviousSection(), ignoreMultiple);
        } else if (beginning) {
            animateTo('#section-1');
        } else if (end) {
            animateTo('#section-' + maxSections);
        }

        // override default actions
        if (up || down || beginning || end) {
            e.preventDefault();
            return false;
        }

    }

});
Click Source
Y.one('body').on('click', function(e) {

        var target = e.target;
        var href = target.get('href');
        var hash, hashOffset;
        var url;
        var anim;

        if (href) {

            // a #section-x link was clicked.

            if (href.match(/section/i)) {

                hashOffset = href.indexOf('#');

                if (hashOffset !== -1) {
                    hash = href.substr(hashOffset);
                    animateTo(hash);
                    e.preventDefault();
                    return false;
                }

            } else {

                // up/down navigation links.

                if (href.match(/\#down/i)) {

                    animateTo('#section-' + getNextSection());

                    e.preventDefault();
                    return false;

                } else if (href.match(/\#up/i)) {

                    animateTo('#section-' + getPreviousSection());

                    e.preventDefault();
                    return false;

                }

            }

        }

    });
Reading through the source you’ll notice the primary function
that we see being used for navigation is animateTo.
The primary part of that function is to note initialization of
the YUI Animation Class
scrollAnimation = new Y.Anim({
    node: scrollElement,
    to: {
        scrollTop: parseInt(targetY, 10)
    },
    // if existing animation was interrupted, move really fast to indicate responsiveness.
    easing: (interrupted ? 'easeOutStrong' : (scrollAction ? 'easeBoth' : 'easeBothStrong')),
    duration: duration
});
The JavaScript is animating the scrollTop of the document.
Also pay attention to the line where the initialization of the easing property occurs.
Notice how there are actually three forms of easings for navigation:
easeBoth (equivalent to easeInOutQuad), easeBothStrong (equivalent to easeInOutQuartic), and
easeOutStrong (equivalent to easeOutQuartic).
For additional eases available in YUI,
refer to the Easing Class.
These easing are being used as follows:
Flickr: Scroll Navigation
easeBoth

If the user scrolls, use a easeInOutQuad easing to move to the next section – start out slow before swift acceleration
followed by gradual deceleration.
The easing makes sense because there is one section moving off stage (easeIn)
followed by another section moving into view (easeOut). Hence the use of easeBoth.
One interesting to note is that the transition is a response to the user’s scrolling.
Because the transition starts out slow, the user may percieve this as a slow responsive website.
The general rule of thumb is to respond to a user interaction quickly.
Thus, potentially slow percieved performance is tradeoff when using an easeInOutQuad transition to respond to the user.
Flickr: Click Navigation
easeBothStrong

- For all other forms of input such as button click or valid keypresses
use a more dramatic easeInOut function: easeInOutStrong (easeInOutQuartic).
- It’s pretty interesting this easing is more exaggerated than that of scrolling.
I think the rational is that because buttons are more custom than native scrolling,
there is more flexibility to define a more dramatic transition.
- From my view, I think the easing for scrolling and clicks should be consistent.
At the same I would imagine that users probably stay with one method of navigation
when browsing the site, so the difference could be negligible.
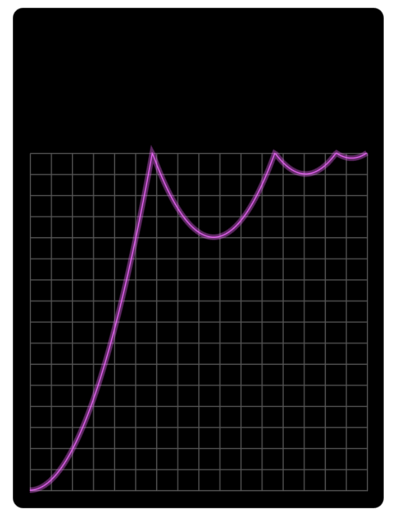
Flickr: Click vs Scroll Comparison

To really compare click navigation(easeInOutQuartic)
vs. scroll navigation(easeInOutQuad), notice the difference
between the click and scroll when they are performed one after another.
Since the click(Quartic) has a higher easing degree than scroll(Quad)
the acceleration for the click is more dramatic.
Note that the click occurs first followed by the scroll.
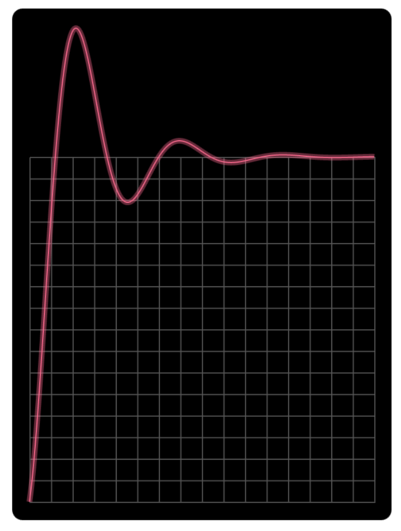
Flickr: Interrupt Navigation
easeOutStrong

- If the user tries navigating while an animation is in progress (an interrupt) perform an easeOutQuartic
easing to the next section. (Note from the dots on the right, that we are navigating from slide 1 to 3)
- The interaction is defined such that when an interrupt occurs navigate to the newly desired slide.
- As such, using easeOutStrong makes sense here. Since the currently slide is already moving
it should continue moving at a high velocity before coming to rest.
Flickr: Far Click
easeBothStrong

This is the same easing as the click navigation discussed above.
In this example, the user jumps over sections navigating to slide 5 from slide 1 by clicking dot 5.
The difference here is that because the scroll animation occurs over a longer distance
within the same time, the velocity here is greater.
Google Glass
Next we’ll look at another implementation of a scroll-jacked
website: Google Glass’ start page.
Google Glass: Click Navigation
easeInOutQuart

This site is implemented using CSS3.
The easing that is being used is a cubic-bezier(.77,0,.175,1), which is easeInOutQuart,
and the site makes use of CSS3 transforms to translate to the next slide.
Recall that Flickr does use easeInOutQuart for some of its easing although the transition
here appears to be more pronounced because a larger object(the background image) is being moved.
This site less ways to navigate and does not allow for interrupts.
The gist of creating this effect is to define a state in which the slide is hidden
and a state in which a slide is active and defining how to transition between each state.
/*
    translate 100% of the slide's body to move it offscreen
*/
.slide {
    transform: translate3d(0,100%,0)
    transition: transform 1s;
    transition-timing-function: cubic-bezier(.77,0,.175,1);
}
/*
    don't translate
    toggling the .active class on a slide will bring the slide into view
*/
.slide.active {
    transform: translate3d(0,0,0)
}
Google Glass: Far Click
The way this site handles skipping over sections is to fade out
the old image and fade in the new image.
It fades out the image using the default transition: ease
and then fading back in using the easeOutQuart cubic-bezier curve.
This interaction differs from Flickr which increases the velocity to make the jump
between slides.

Paul Stamatiou
Paul Stamatiou is a designer at Twitter.
This is a pretty interesting interaction he used for his site’s navigation.
This interaction uses a custom bezier-curve cubic-bezier(0.325, 0, 0.000, 1.650)
which is a combination of a very short easeIn followed by an
exaggerated easeOutBack. This gives the navigation playfulness.
Source: Ceaser
Google Design Example: Radial Action
This example is from Google’s Material Design section on
Responsive Interaction.
In this example we see that the epicenter of action occurs at left and ripples out to the right.
Tools
Some tools I would recommend to further explore easing are:
- easings.net
- provides a visual holistic overview of easing functions as well as methods to performing the easing in JavaScript and CSS.
- cubic-bezier.com

- CSS easing tool created by Lea Verou to preview and compare various easings in CSS. This tool
also lets you create your own custom easings.
- This tool also allows one to share various easings as a url by specifying the parameters as a fragment like so
http://cubic-bezier.com/#.17,.67,.83,.67
- Ceaser
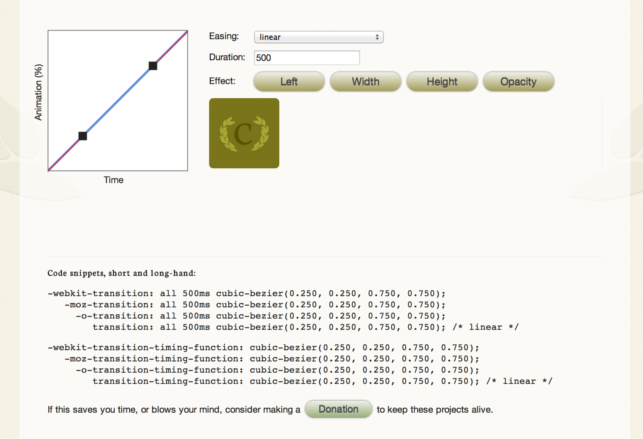
- Another CSS easing tool created by Matthew Lein.
- Unlike cubic-bezier(mentioned above):
- Has finer granularity
- No side-by-side comparisons
- In addition to animating position, the tools also allows you to animate width, height, and opacity.
Conclusion
Motion is becoming more prevalent on the web and on mobile.
I hoped through this post you have developed an understanding of what easings are the relationship betwen different easings and
learned how to choose and apply easings. Lastly I’ve linked some videos for inspiration.
The illusion of life from cento lodigiani on Vimeo.
Elements of Design from matt greenwood on Vimeo.
Further Reading
- 12 Principles of Animation
- Robert Penner Easing Resources
- Google Design Guidelines
- Google Web Fundametals on Easing
- Motion and Animation, A new mobile UX Design Material