
Introduction
I recently relaunched my portfolio! My site is currently runs on Amazon EC2 which is a service that Amazon provides that allows users to rent virtual computers to run their own applications. The backend of my application runs on express, a web application framework for node. My client side code is written using Guac, a framework I wrote modeled after jQuery after studying its source code. This framework is still under active development.
In this post I will talk about my NodeJS production environment on Amazon EC2.
How EC2 fits into Scalable Web Architecture
Usually when building scalable web architecture, you will have multiple instances of your application behind load balancers. Below the web server/application layer is the persistence layer that runs a database management system. Finally, since roughly 80-90% of the end-user response time is spent downloading static components in the page (Performance Golden Rule.), a Content Delivery Network is used to distribute static content. A CDN manages servers in multiple geographically distributed locations, stores copies of the videos (and other types of Web content, including documents, images, and audio) in its servers, and attempts to direct each user request to a CDN location that will provide the best user experience.
Read here for more on Scaling Internet Applications.
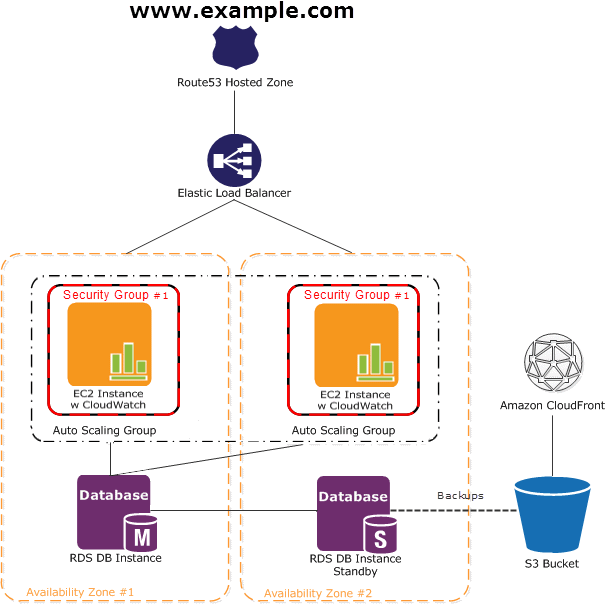
Amazon’s getting started with AWS highlights a sample web application designed in the manner described above. From their website:
In this diagram, Amazon EC2 instances run the application and web server and belong to an Amazon EC2 Security Group.
The Amazon EC2 Security Group acts as an exterior firewall for the Amazon EC2 instances.
An Auto Scaling group is used to maintain a fleet of Amazon EC2 instances that can handle the presented load.
This Auto Scaling group spans over multiple Availability Zones to protect against potential failures if an Availabilty Zone becomes unavailable.
To ensure that traffic is distributed evenly among the Amazon EC2 instances, an Elastic Load Balancer is associated with the Auto Scaling group.
If the Auto Scaling group launches or terminates instances based on load, then the Elastic Load Balancer will automatically adjust accordingly.
The database tier consists of Amazon RDS database instances, including master and local slave, located in multiple Availability Zones for failover protection.
Amazon RDS provides automated backups to Amazon S3. Amazon S3 stores backups and static content.
Since the consumers of this application may be globally distributed or a large number may visit the site at one time, high volume static content is edge cached using Amazon CloudFront for better performance.
Amazon Route 53 can be used to provide secure and reliable routing to your infrastructure that uses Amazon Web Services.
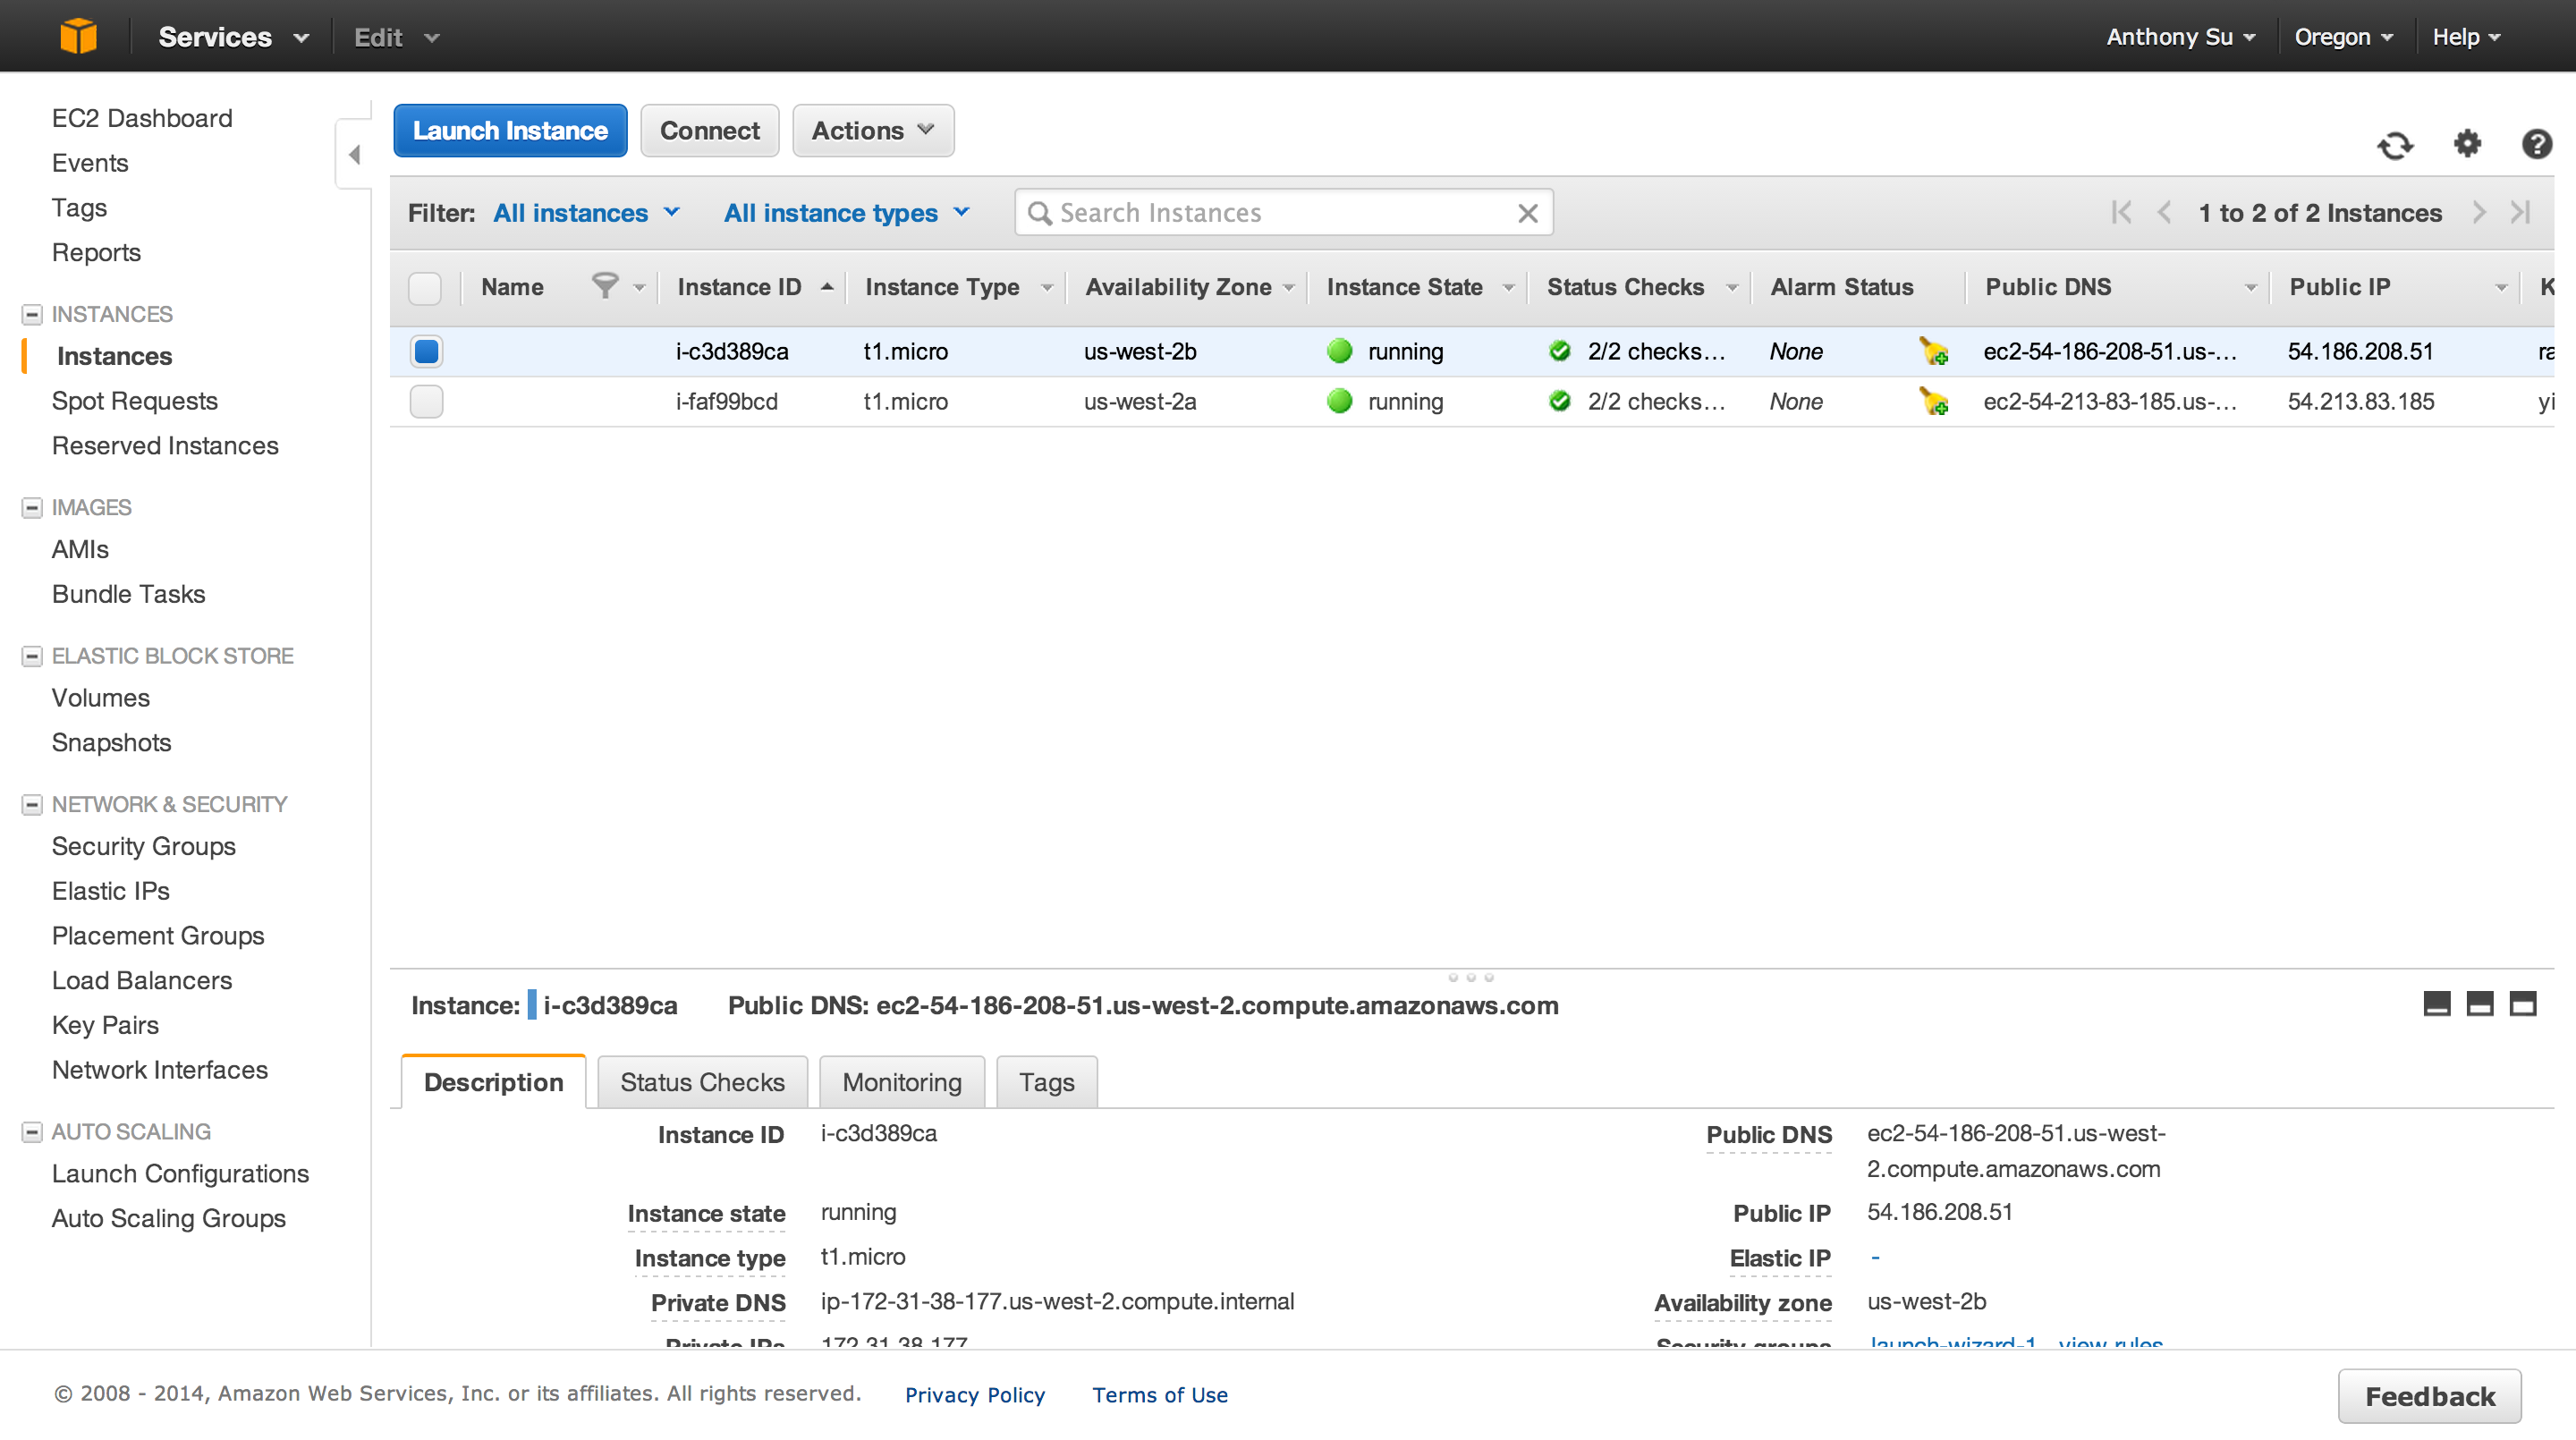
My personal website, radialglo, operates at a small scale and simply use Amazon EC2 to run my web and application server. Since my site recieves relatively low traffic, I currently don’t use load balancers, and to minimize costs I currently don’t use a CDN.
Create AWS account
If you haven’t already create an Amazon Web Services account. Please note that there is a free usage tier for the first 12 months after you sign up for AWS.
Setting up an Amazon EC2 instance
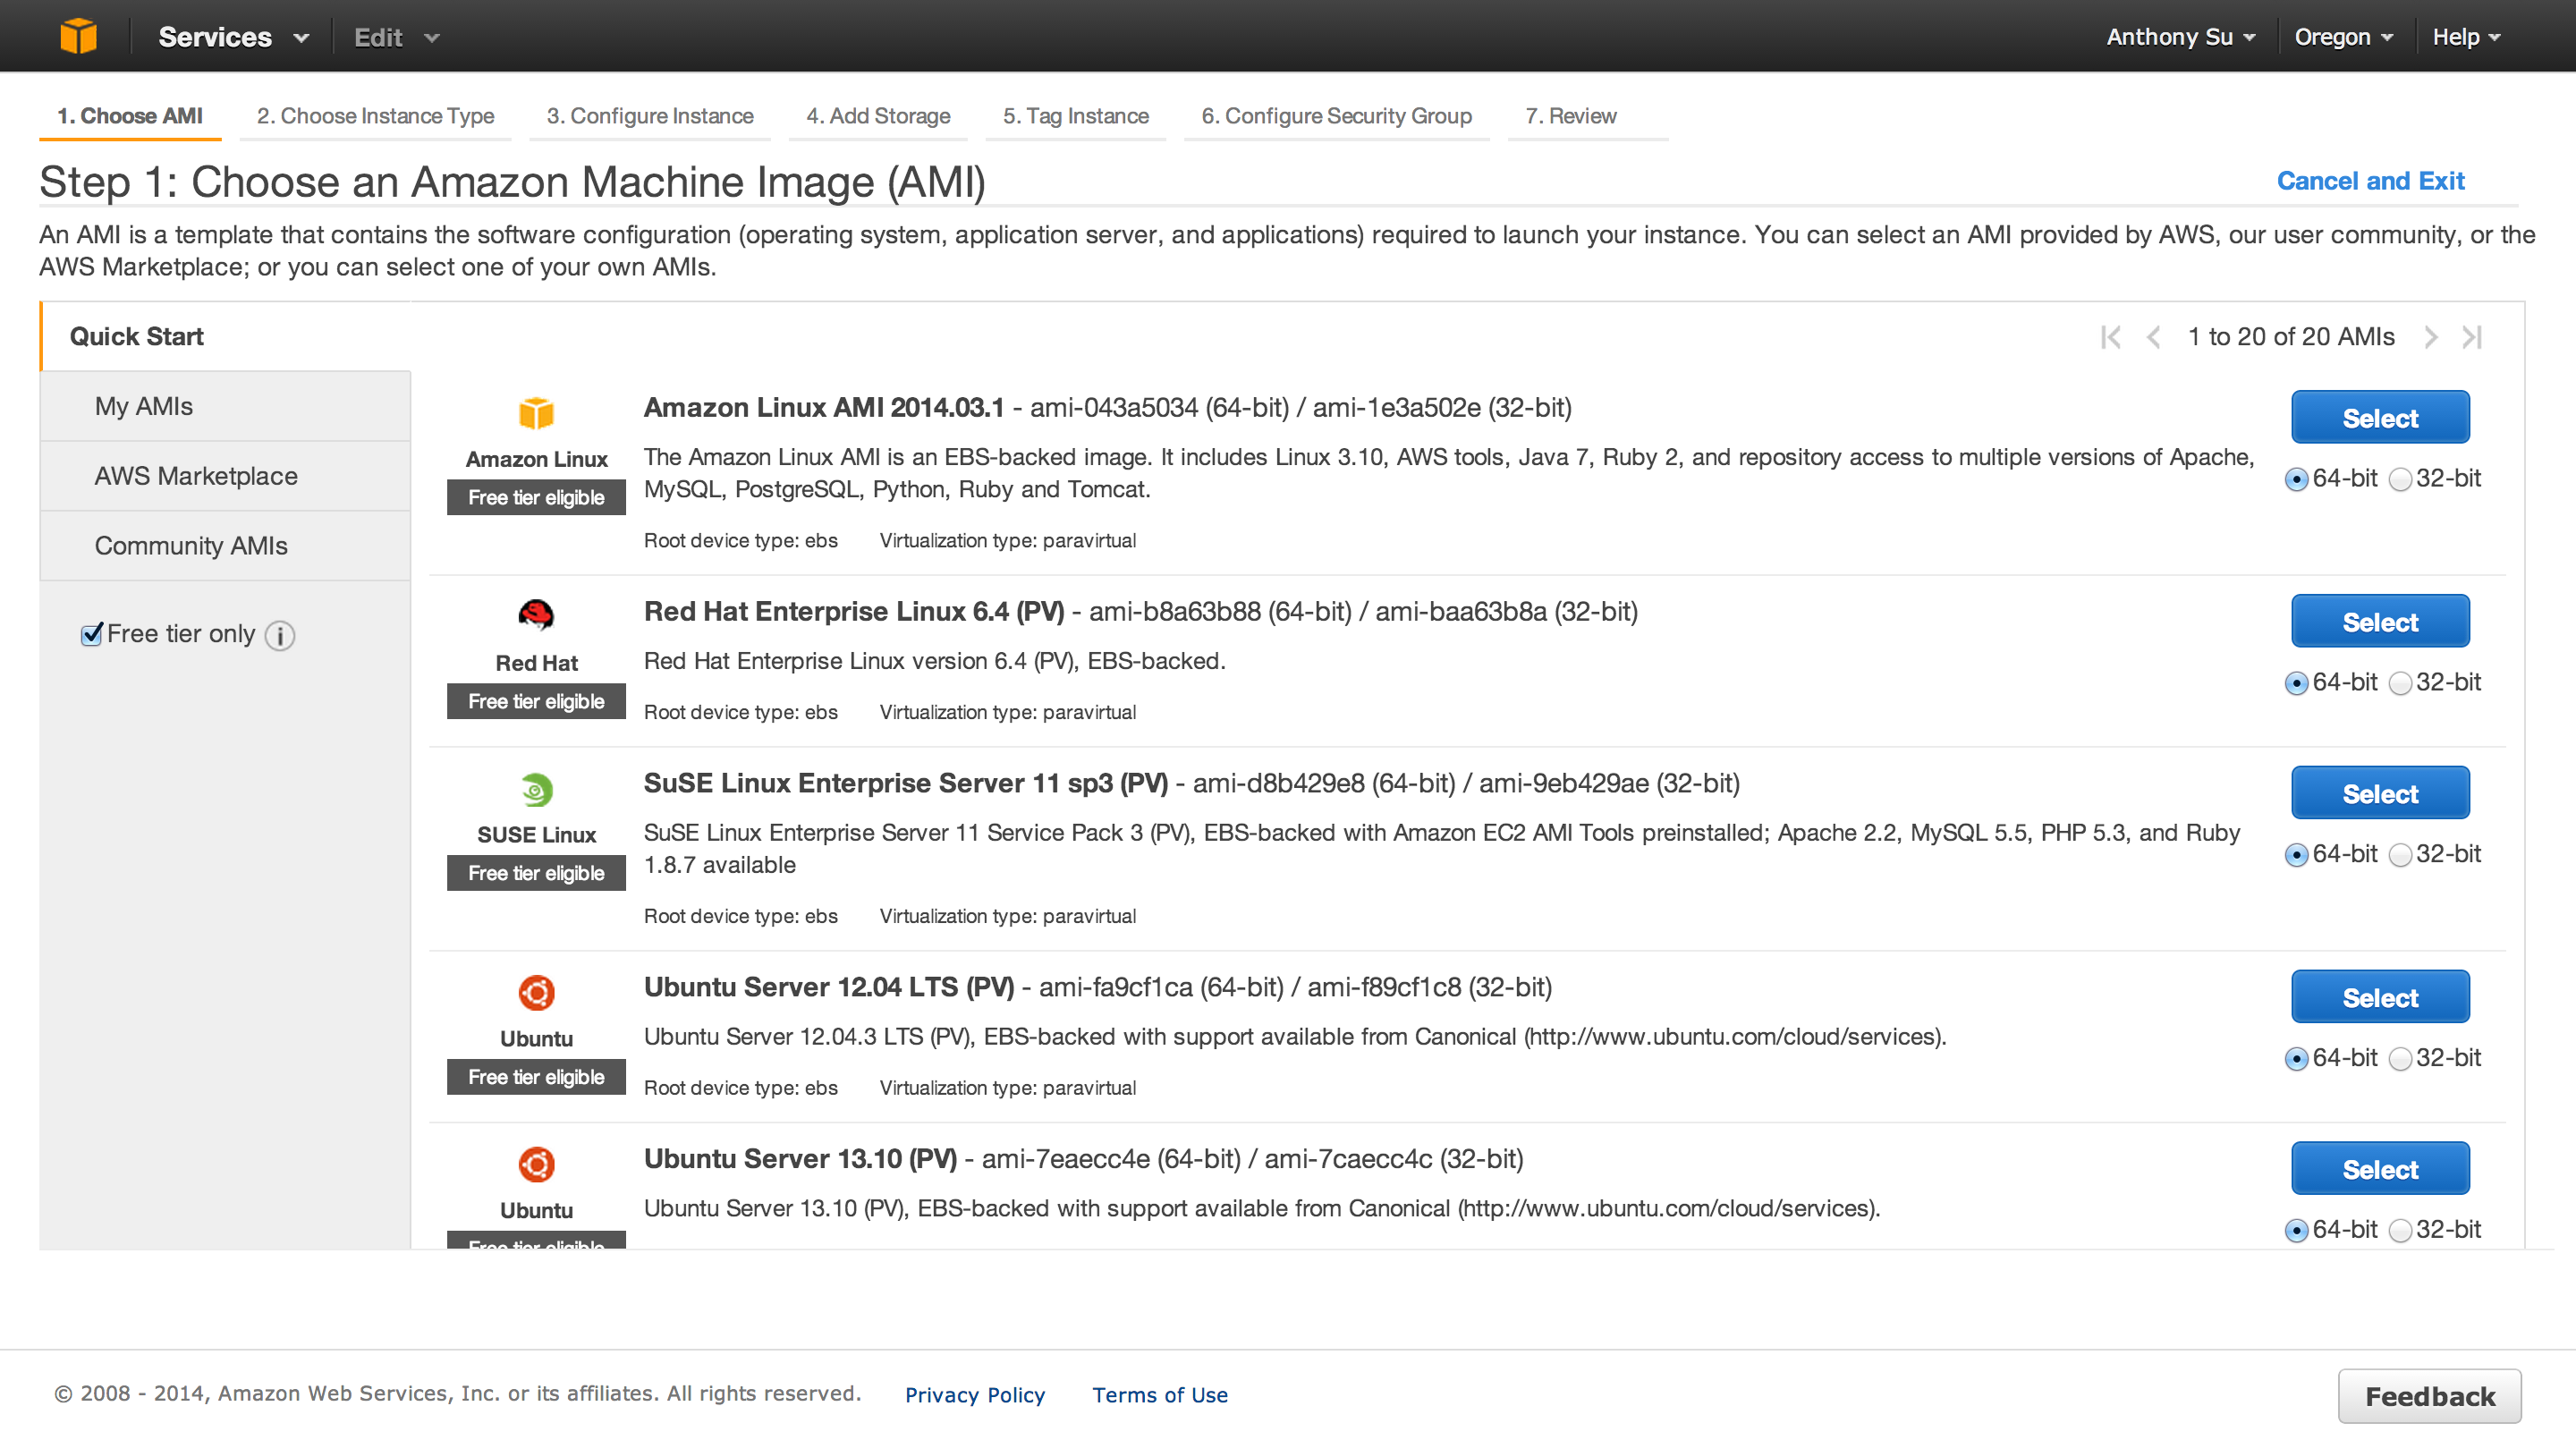
After setting up your AWS account, you will need to choose the type of AMI you want to run.
Choose an AMI
An AMI (Amazon Machine Image) is a template that contains the software configuration (operating system, application server, and applications) required to launch your instance. You can select an AMI provided by AWS, our user community, or the AWS Marketplace; or you can select one of your own AMIs.
Essentially you choose the type of operating system you want to run, and create an instance of that operating system. A similar analogy would be purchasing a MacBook Air which is an instance of the Mac OS X operating system. At the time of the writing I selected Ubuntu 13.10 (Saucy Salamander) Server. as my AMI.
Difference Between Desktop and Server Images
The server image is a stripped down version of the desktop image with additional server software such as Apache 2. Ths additional software allows other computers/machines to communicate with your server. The server also does not contain a GUI(graphical user interface) for security and performance reasons.
More from the ubuntu documentation.
1. The first difference is in the CD contents. The “Server” CD avoids including what Ubuntu considers desktop packages (packages like X, Gnome or KDE), but does include server related packages (Apache2, Bind9 and so on). Using a Desktop CD with a minimal installation and installing, for example, apache2 from the network, one can obtain the exact same result that can be obtained by inserting the Server CD and installing apache2 from the CD-ROM.
2. The Ubuntu Server Edition installation process is slightly different from the Desktop Edition. Since by default Ubuntu Server doesn’t have a GUI, the process is menu driven, very similar to the Alternate CD installation process.
3. Before 12.04, Ubuntu server installs a server-optimized kernel by default. Since 12.04, there is no difference in kernel between Ubuntu Desktop and Ubuntu Server since linux-image-server is merged into linux-image-generic.
4. For Ubuntu LTS releases before 12.04, the Ubuntu Desktop Edition only receives 3 years of support. This was increased to 5 years in Ubuntu LTS 12.04 In contrast, all Ubuntu LTS Server Edition releases are supported for 5 years.
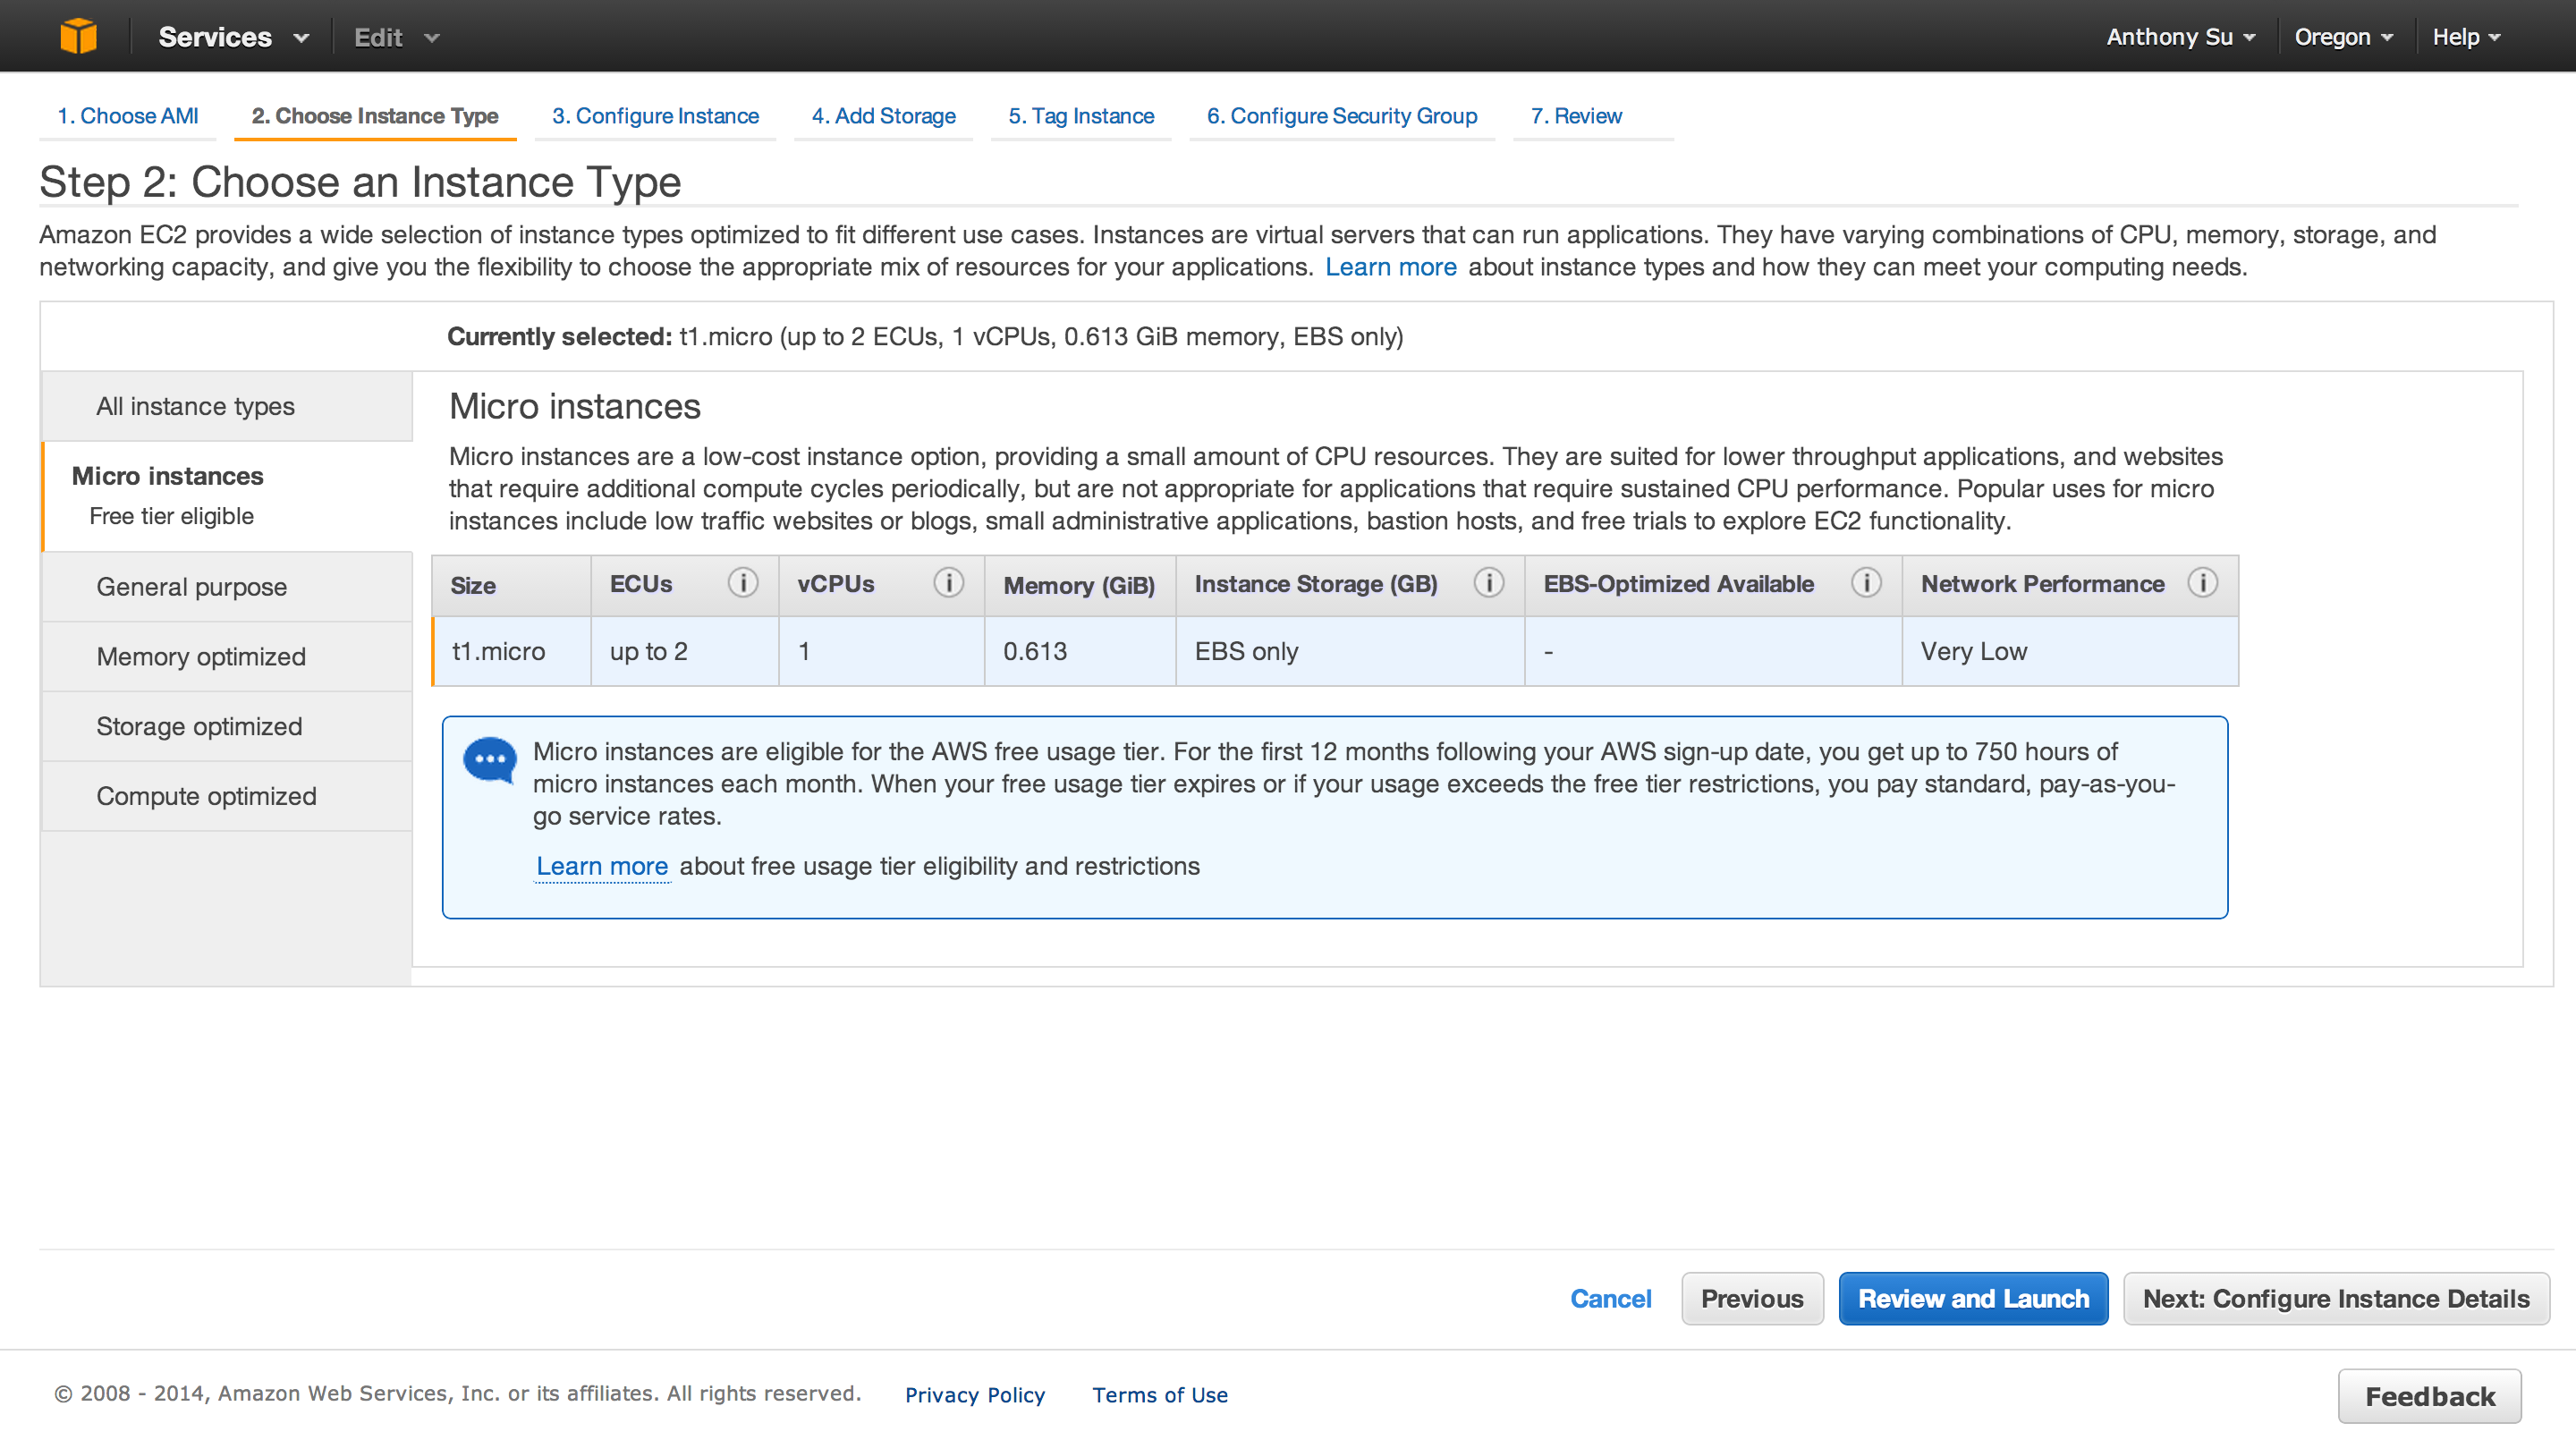
Choose an Instance Type
After selecting your AMI, choose an instance type.
Instance types have varying CPU, memory, storage, and networking capacity which gives you the flexibility to choose the appropriate mix of resources for your applications Since I’m running low traffic website, I used the t1.micro instance which is part of the free eligibility tier.
For steps 3 and 4 in the dashboard, I used the default instance and storage configurations. I also skipped step 5 for tagging instances, because I am currently running on instance.
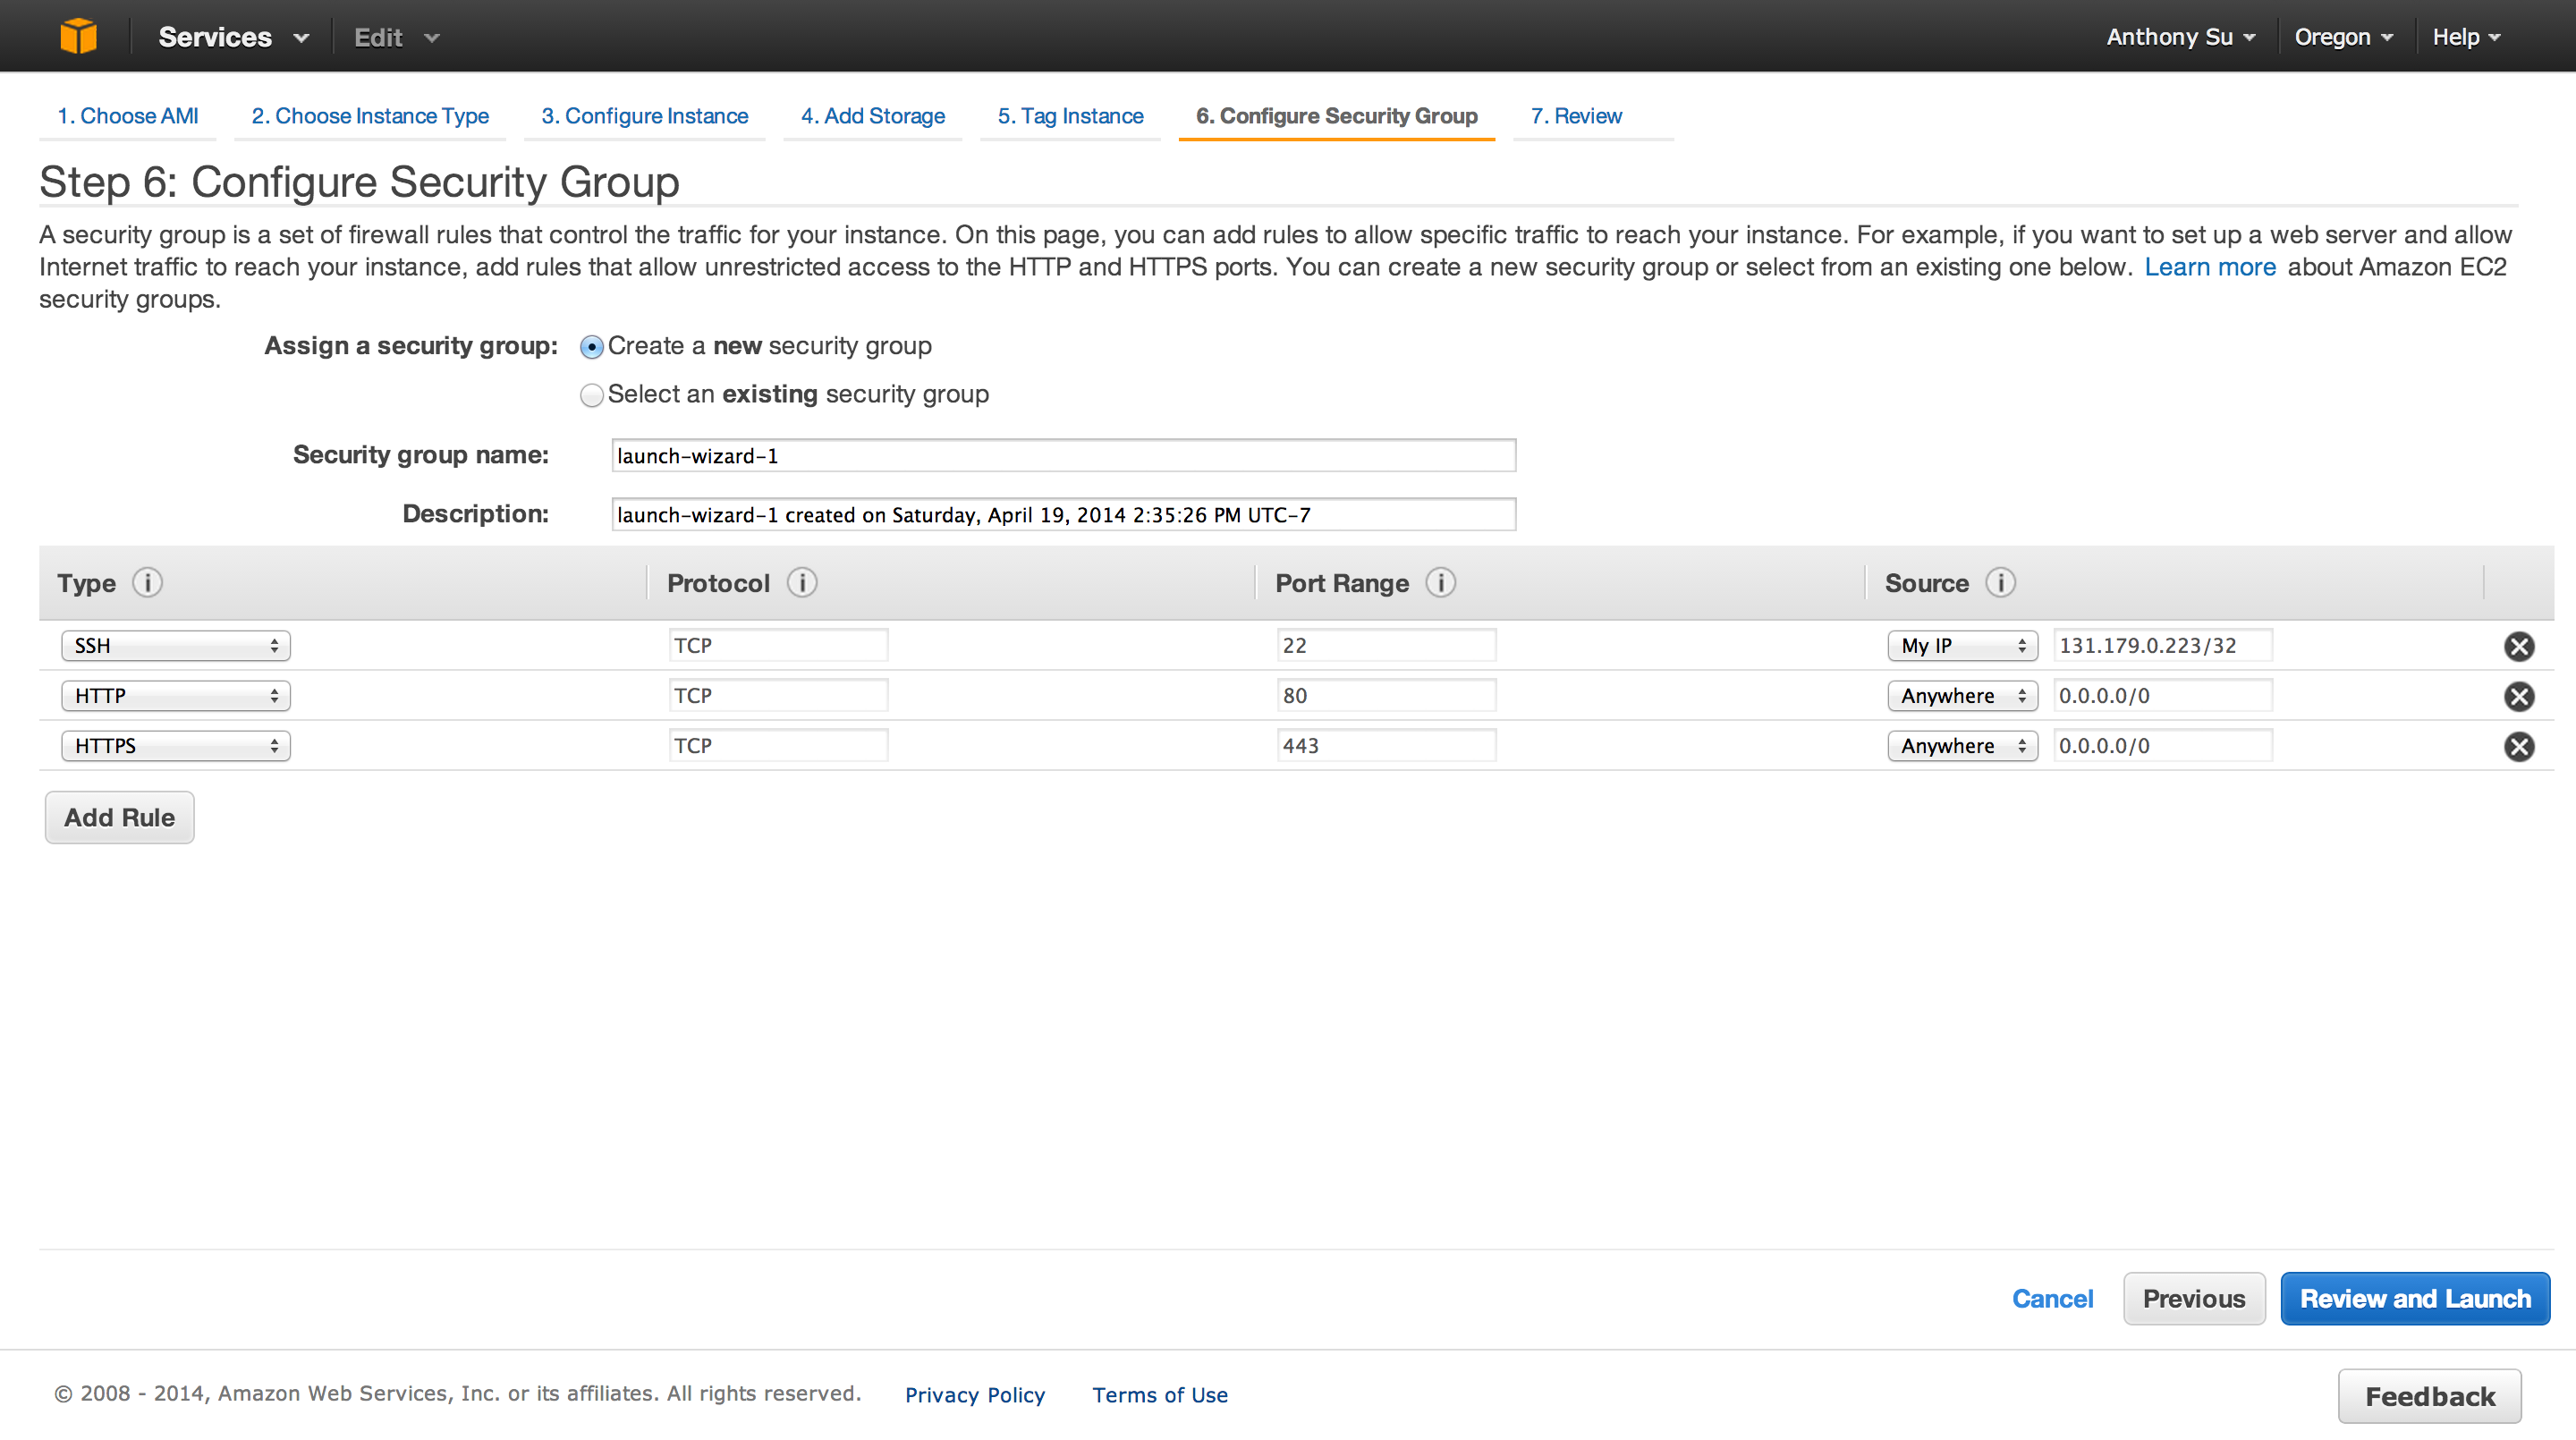
Security Groups
A security group defines firewall rules for your instances.
These rules specify which incoming network traffic should be delivered to your instance (e.g., accept web traffic on port 80). All other traffic is ignored. You can modify rules for a group at any time. The new rules are automatically enforced for all running instances. For more information about security groups, go to Using Security Groups in the Amazon Elastic Compute Cloud (Amazon EC2).
Logging into Your EC2 Instance
You must use key-based authentication to login to your Amazon EC2 Instance. This allows you to securely access your instance without a password.
You can also import your own key pairs to your Amazon instance. For more refer to EC2 Key Pair Documentation
On a Linux/Unix instance, the public key content is placed in an entry within ~/.ssh/authorized_keys.
After you have created/downloaded your private key pair you can ssh
into your server using that private key ssh -i ~/.ssh/your_private_key remote_user@remote_host
I added my EC2 instance to my user ssh configuration file in my local development environment located at ~/.ssh/config.
1 2 3 4 | |
Now I can simply ssh into my EC2 instance with the command ssh awshost.
You can also add a bash alias ~/.bash_aliases for issuing this command. For example:
1
| |
Port Forwarding
Before proceeding make sure you that the security group for your instance has been configured to accept HTTP traffic on port 80.
Why port forward
Running with superuser privileges (in order to bind the port) may be a security risk to the host, therefore port forwarding is used to redirect a low-numbered port to another high-numbered port, so that application software may execute as a common operating system user with reduced privileges. Standard practices say no non-root process gets to talk to the Internet on a port less than 1024.
Use case for port forwarding
Express (the web application framework for node) is capable of performing everything that is expected of a modern web server, such as logging requests, HTTPS, serving files and so on.
If you are running a small application it may make sense to have your node application double up as a web and application server. This is where port forwarding comes in. Because I ran my application as both web and application server, giving root access is not ideal because my application server should not need root permissions.
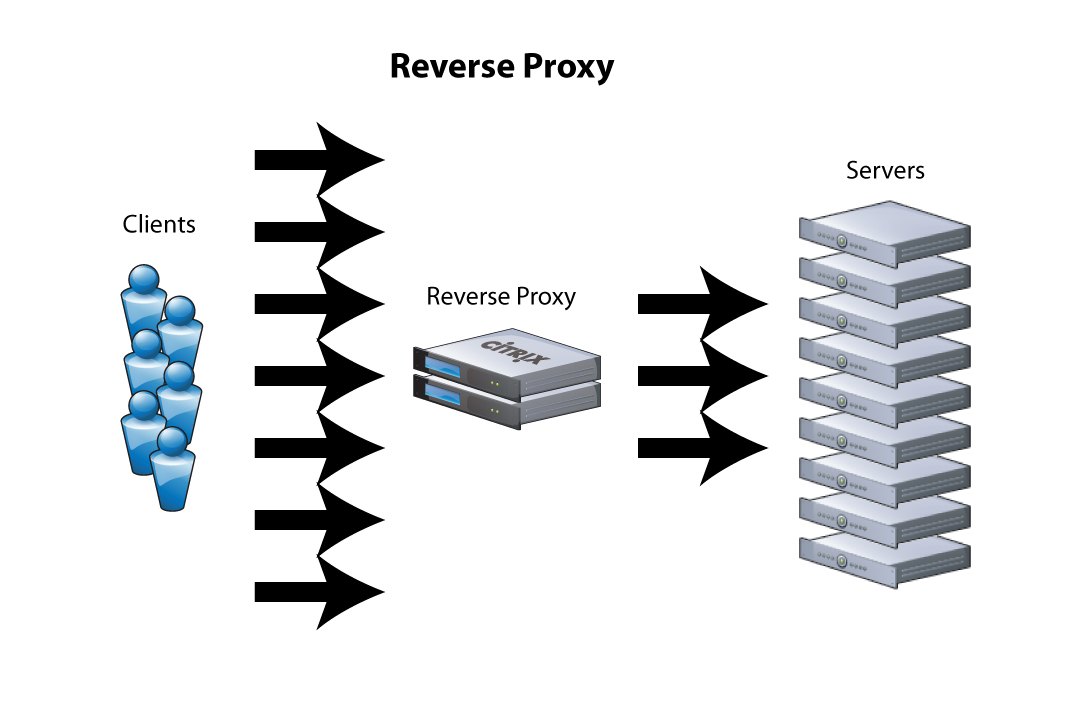
However, if you are building a large scalable, application you should put a reverse proxy in front of the application server. More regarding reverse proxies will be discussed below.
Enable port forwarding
The /etc/sysctl.conf file allows you to configure various Linux networking and system settings.
No settings where enabled for my EC2 Instance by default. Running cat /proc/sys/net/ipv4/ip_forward will print 1 if forwarding is enabled.
Now we want to edit /etc/syctl.conf to enabled port forwarding.
sudo vim /etc/sysctl.conf
In this file, uncomment this line:
net.ipv4.ip_forward
This will enable ip forwarding. Then, to enable the changes made in sysctl.conf:
sudo sysctl -p /etc/sysctl.conf loads the values from the file we just edited.
Now, let’s check that ip forwarding is enabled:
cat /proc/sys/net/ipv4/ip_forward
This should print 1.
How to port forward
Kent Brewster at Pinterest wrote a useful gist for getting node to talk to port 80. Here are the steps I went through.
1 2 3 4 5 6 7 8 9 10 11 12 13 14 15 16 17 18 19 20 21 22 23 24 25 26 27 28 29 30 31 32 33 34 35 36 37 38 39 | |
Reverse Proxy - an alternative to port forwarding
A reverse proxy manages inbound request from the internet and manages connections within your servers, where as forward proxies filters outbound connections from clients.
More specifically from the Apache mod_proxy documentation:
An ordinary forward proxy is an intermediate server that sits between the client and the origin server. In order to get content from the origin server, the client sends a request to the proxy naming the origin server as the target and the proxy then requests the content from the origin server and returns it to the client. The client must be specially configured to use the forward proxy to access other sites.
A typical usage of a forward proxy is to provide Internet access to internal clients that are otherwise restricted by a firewall.
As standard practice in the industry, you should put reverse proxies in front of the application server to load balance and scale the app.
A reverse proxy (or gateway), by contrast, appears to the client just like an ordinary web server. No special configuration on the client is necessary. The client makes ordinary requests for content in the name-space of the reverse proxy. The reverse proxy then decides where to send those requests, and returns the content as if it was itself the origin.
According to this article written by Citrix, reverse proxies are also particularly good for application delivery including:
- Load Balancing (TCP Multiplexing)
- SSL Offload/Acceleration (SSL Multiplexing)
- Caching
- Compression
- Content Switching/Redirection
- Application Firewall
- Server Obfuscation
- Authentication
- Single Sign On
I currently have not set up a reverse proxy, but am looking into setting one up in the next iteration.
Setting Up Git for Deployment
If you need a refresher on Git I would recommend talking a look at Atlassian’s Git Tutorials and the Git book.
My code deployment is adapted from Getting Git on a Server from the the Git book and http://toroid.org//ams/git-website-howto.
The gists of my setup is to create a create a bare repository for shared users to check in their code and a separate working directory( a single checkout of one version of the project ) that is populated with code from the bare repository via a post-recieve hook.
1 2 3 4 5 6 7 8 9 10 11 12 13 14 15 16 17 | |
Setting up NodeJS
For more information regarding installing node via package manager refer to documentation here.
I installed node on Ubuntu 13.10.
1 2 3 4 5 6 7 8 9 10 11 12 13 14 15 | |
Linkedin wrote a great article for performance tips for NodeJS.
Setting up Express
First let’s install express.
1
| |
--save saves meta data regarding your dependencies (name and version number) into a dependency management file called package.json. Using the flag --save-dev saves the dependencies
as development dependencies. The package.json file is really convenient because you don’t need to save your
A middleware is a JavaScript function to handle HTTP requests to an Express app. It can manipulate the request and the response objects or perform an isolated action, or terminate the request flow by sending a response to the client, or pass on the control to the next middleware (from Express Web Application Development ).
I am currently using Express 4 which is quite bare bones in comparison to Express 3 because it no longer comes with bundled middleware.
My package.json for development looks like this:
1 2 3 4 5 6 7 8 9 10 11 12 13 14 15 16 17 18 19 20 21 22 23 24 25 26 27 28 29 | |
Some useful packages include compression and body-parser.
As previously mentioned, Node can also serve as a web server.
For example, Node serves static content. compress is used to gzip static content before it is
returned to the user:
1 2 3 4 5 6 7 8 9 10 11 12 13 14 15 16 17 18 | |
Templating
To decouple the output representation, I used Jade, a templating language to handle the view.
npm --save express to install express.
1 2 3 4 5 | |
AWS SDK for JavaScript
Amazon also provides an AWS Software Development Kit for NodeJS. This provides opportunities to build more complex applications.
I learned a lot from developing version 2 of radiaglo.com, and for next iteration look to experimenting more with other services provided by AWS such as S3 as well as configuring servers (nginx in particular).